Reading an Aurora Photograph: Exposure, Color and Context
A practical observation guide using attributed reference imagery, without claiming a Polar Nature field trip.
Begin with the caption, not the saturation
An aurora photograph records both an atmospheric event and a set of camera choices. Ask where and when the image was made, how long the exposure lasted and whether the displayed colors were adjusted. A missing detail does not make the image false, but it limits what a reader can infer.
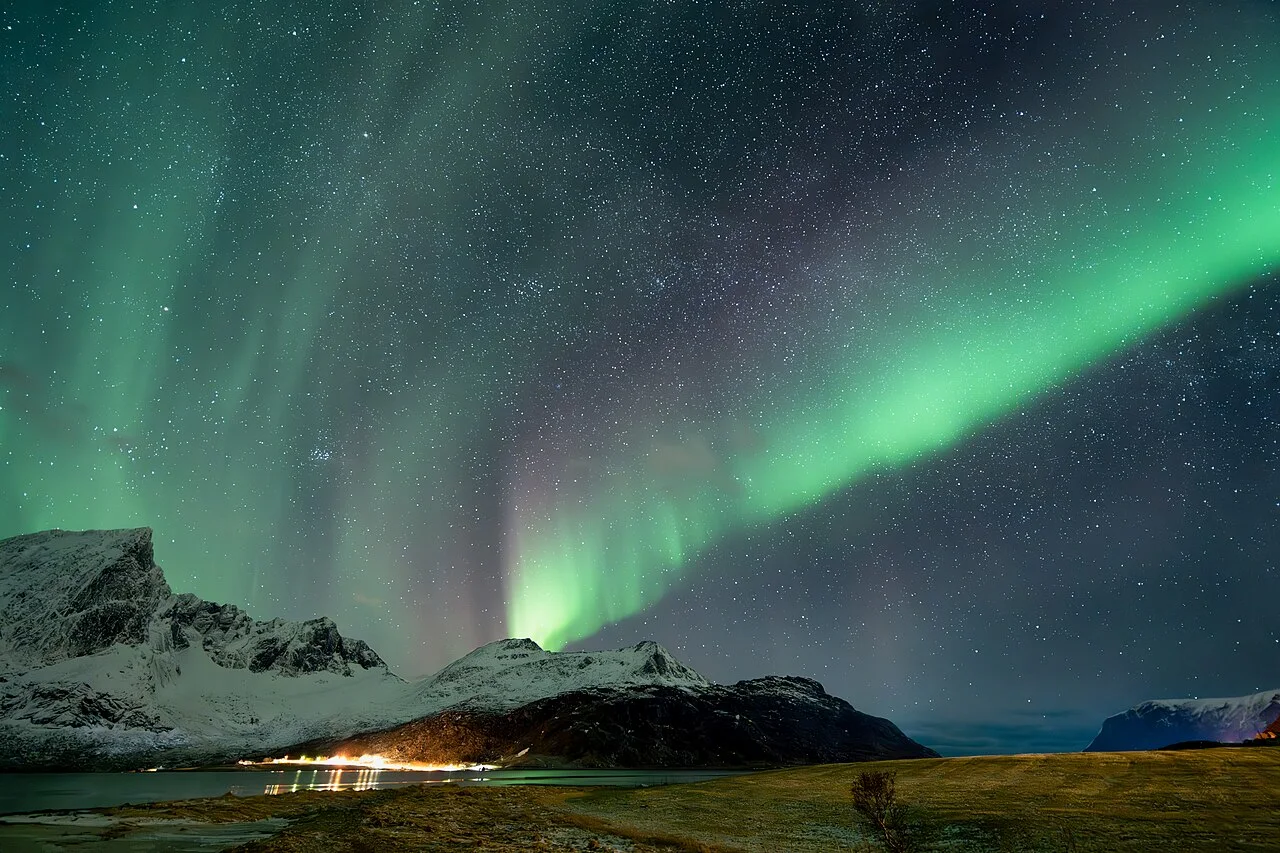
The reference image on this page is credited to its actual creator. It is not evidence that Polar Nature spent twelve nights in Norway or operated a field-photography project. Those unsupported claims from the previous version have been removed.
Motion and brightness are recorded differently
A long exposure adds light over time. It can make a faint display look vivid, while rapid movements become blended rather than sharply separated. A short exposure may preserve shape but record less light. The camera image and an observer's moment-by-moment visual impression can therefore differ without either being fraudulent.
White balance and processing change the displayed result too. For physical interpretation, return to the mechanism of atmospheric emission; for interpreting the image, examine the recording information. One does not replace the other.
Try a three-part observation note
Describe the visible form without overinterpreting it: an arc, rays, diffuse light or a curtain-like structure. Separately record the conditions such as cloud, twilight and nearby artificial light. Finally record what is known about the camera and processing. This creates a more useful account than a single adjective such as spectacular.
Do not use an old image to promise tonight's visibility. NOAA's viewing guidance and current official forecasts address conditions; the photograph documents an earlier observation. This guide is about reading that record, not predicting a show or prescribing a trip.
Read the recording details of this actual photograph
The cover's original Commons page identifies Eric Kilby as its creator and February 20, 2023 as the capture date. Its metadata records a five-second exposure, aperture f/2 and ISO 8000. Those details give this example a concrete interpretation: each displayed frame combines light collected over five seconds. It is not an instantaneous sample of the moving display or a calibrated reconstruction of what a person saw.
An open aperture and the camera's sensitivity setting help explain the recording choices, but metadata alone does not reveal every processing adjustment. Do not infer that the display remained motionless, or that ISO independently measures natural brightness. Use the source record to distinguish the capture date from the page's later upload history. The linked file page provides the checkable record; our explanation applies it to the image shown here.
Displayed color and emission mechanism are separate questions
The physical explanation of auroral light concerns atmospheric emissions, while the displayed image also depends on the sensor, white balance and processing. Knowing the mechanism does not recover every camera choice, and inspecting the camera settings does not replace the atmospheric explanation. Use the companion physics article for the first question and the image's source information for the second.
A useful caption can say that an image illustrates visible structure without claiming that its saturation reproduces every observer's visual impression. Avoid judging authenticity solely by whether a color looks unusually vivid. Instead ask what processing was disclosed and what claim the image is being used to support. A documentary illustration and a calibrated brightness measurement require different information.
Cloud and artificial light can complicate the scene
Before naming every colored feature an auroral structure, inspect whether cloud, town lighting or twilight contributes to the frame. These conditions can coexist with an aurora. A single still may leave some features ambiguous, so describe what is visible and retain uncertainty rather than assigning every patch a confident physical identity.
This is especially useful when a photograph is viewed without its original caption. Recover the source, place and time where possible. A repost may omit information that distinguished a natural display from other light in the scene. Returning to the credited source is more reliable than building an explanation from a compressed image whose context has been lost.
Compare a sequence with consistent references
A sequence can reveal changes more clearly than a single photograph, but the comparison needs stable references. Ask whether the camera moved, the framing changed or the recording settings were adjusted. A shifted viewpoint can make a feature appear to move relative to the horizon even when part of the apparent change comes from the observer's position.
For an educational note, describe the visible change first: a bright region expanded in the frame, a ray-like feature changed position or an arc became less distinct. Then distinguish the interpretation from the observation. Without suitable timing and scale, avoid assigning an exact speed or height. The sequence can document evolution while leaving some physical quantities unresolved.
An old image does not forecast a new night
A reference photograph demonstrates an earlier recorded scene under its own conditions. It does not establish cloud cover, darkness or auroral activity for a future visit. NOAA's viewing guidance provides the relevant framework for considering current conditions, while official forecasts address a different time from the image. Keep those dates separate when sharing a dramatic photograph alongside an outlook.
A good observation guide can help readers understand why a promising forecast is not a guaranteed photograph. The atmospheric event, local conditions and the observer's recording choices all matter. There is no need to promise an experience in order to explain the evidence. Treat the photograph as a record and the forecast as information about a specified future interval.
Write a caption that helps another reader
A useful caption identifies the creator and location, gives the date when known and states the relevant recording or processing information available from the source. Follow that with a restrained description of visible structure. If the photograph is illustrative rather than part of a measurement project, say so. Missing information should remain missing rather than being replaced by plausible camera settings.
The final test is whether a reader can separate what happened in the atmosphere from how the image was recorded and displayed. That distinction adds value beyond another beautiful aurora picture. It supports careful comparison, makes uncertainty visible and allows readers to appreciate both the science and the photograph without forcing them to have identical evidential roles.
Retain a time sequence's spacing
When a display is shown as a sequence, check the time between frames as well as the exposure duration. A rapid montage can compress long intervals and change the impression of motion. The sequence remains useful when its timing is stated, allowing viewers to distinguish the event's evolution from the presentation's pace.